CS2 comes with many improvements over CS:GO that make navigating around it more convenient for the average player. Many of these features are available via the game’s menus, but for accessing everything at once, the console is your best friend.
Many Counter-Strike players don’t even use the game’s menus: once you discover the CS2 console, you may find that it’s easier to input a string and a value to immediately run commands or change a setting.
Here’s how to turn on the console in CS2 and a quick guide on alternative ways to open and use it.
Table of contents
- How to enable the console in CS2
- Opening the console in CS2
- What can you use the console for in CS2?
- Useful CS2 console commands for beginners
How to enable the console in CS2
There are two primary ways to enable the console in CS2. The first and easiest method is to toggle the “Enable Developer Console” setting in the main menu, while the other requires you to input a launch command on Steam.
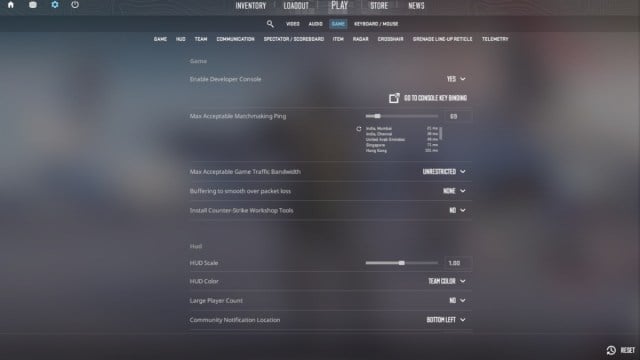
Most users will do just fine by changing the setting in the main menu.
- Click the Settings icon in the top left of the screen. It’s shaped like a gear or cog.
- Navigate to the Game tab.
- The Enable Developer Console option is in the first section of options on your screen. Simply click on it and switch it to “Yes,” and you can use the in-game console.
Alternatively, you can add a command in your game’s launch options, essentially forcing the setting to “Yes” whenever you start the game. To do so, follow these steps:
- Open your Steam Library.
- Navigate to Counter-Strike 2.
- Right-click and select Properties.
- Scroll down to Launch Options and add “-console” (without the quotes) to the text box, then close the window.
Now, whenever you launch CS2, the console is ready for you to use.
Opening the console in CS2
By default, once you’ve enabled the console in CS2, you’ll have to hit the tilde (~) key on your keyboard to open the console window during a match or in the main menu. It’s usually located in the top left of your board, below the Escape key.
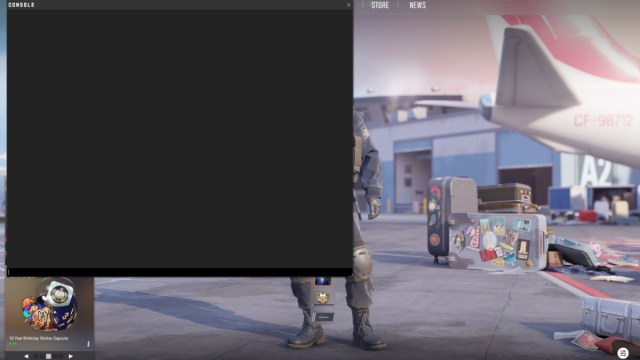
If you’d prefer to use the tilde key for something else, you can rebind the key that opens the console in your keyboard and mouse settings. To rebind the console key:
- Open your game settings in the top-left.
- Select the “Keyboard / Mouse” tab.
- Under Keyboard & Mouse Settings, scroll to the UI Keys settings. The final option is the default key for Toggle Console.
- Click the setting on the right, then enter your new key bind when prompted.
What can you use the console for in CS2?
CS2’s console gives players almost unlimited access to the backend settings for their client—far more than the game’s menu grants. It’s an essential tool for Counter-Strike, with the ability to tweak your crosshair and sensitivity, adjust volume, join and leave community servers, display performance statistics, and so much more.
You can even enable cheat commands, but this will not work on most servers and is only available in private sessions.
In addition, if you’ve set any specific launch options like “-dev” and “-console” in the game’s Properties tab on Steam, you can override those settings using console commands.
Useful CS2 console commands for beginners
We’ve included several simple console commands that players often use in CS2. You’ll only need to enter most of these into the console once, but others may require re-entry each time you load the game.
- disconnect: Disconnects you from the current server and takes you to the main menu.
- quit: Closes the game immediately, taking you to your desktop.
- fps_max <amount>: Sets a hard cap on your FPS. Replace <amount> with the FPS value you’d like to max out at. It is recommended players select a high number (over 800) regardless of whether they’ll reach that mark.
- voice_enable 1: Turns on voice chat for all players.
- voice_enable 0: Disables all voice chat
- sv_cheats 1: Enables access to cheat commands.
- sv_cheats 0: Toggles off the access to cheat commands
- noclip: Enables Counter-Strike’s Noclip mode, allowing you to fly freely around the map. Enter the command again to disable Noclip. Even better, I recommend binding it to a key, which brings us to:
- bind <key> <command>: The basic key bind command in Counter-Strike. Replace <key> with your chosen key and <command> with what you want the key to do. To see what is bound to a certain key, drop the <command>, and the console will display what is currently attached to a key.
- help <command>: Gives a short description of what the chosen command does. Replace <command> with the command of your choice.
- clear: Wipes the console clear of all commands and messages.
- volume 0.x: Puts the volume at a certain level, where you need to replace x with the number you want to set it on.
- bot_add: Adds a bot in a practice match.
- bot_place: Places a bot in a certain place in a practice match.
- kill: Eliminates you if you’re stuck or in need of an immediate death.






Published: Nov 9, 2024 10:17 am