
Crafting your gear in Final Fantasy 16 (FF16) can be an excellent way to use your resources and increases your health, defense, attack damage, and stagger damage. But the rarer and more powerful pieces of equipment often need rare materials, like the Earth Shard.
The Earth Shard, like all Elemental-based Shards, is dropped by defeating the Eikon of that nature. Here’s everything you need to know about how to get the Earth Shard and how to craft Grindstone, a mighty sword, using the Earth Shard in FF16.
How to get the Earth Shard in Final Fantasy 16, explained
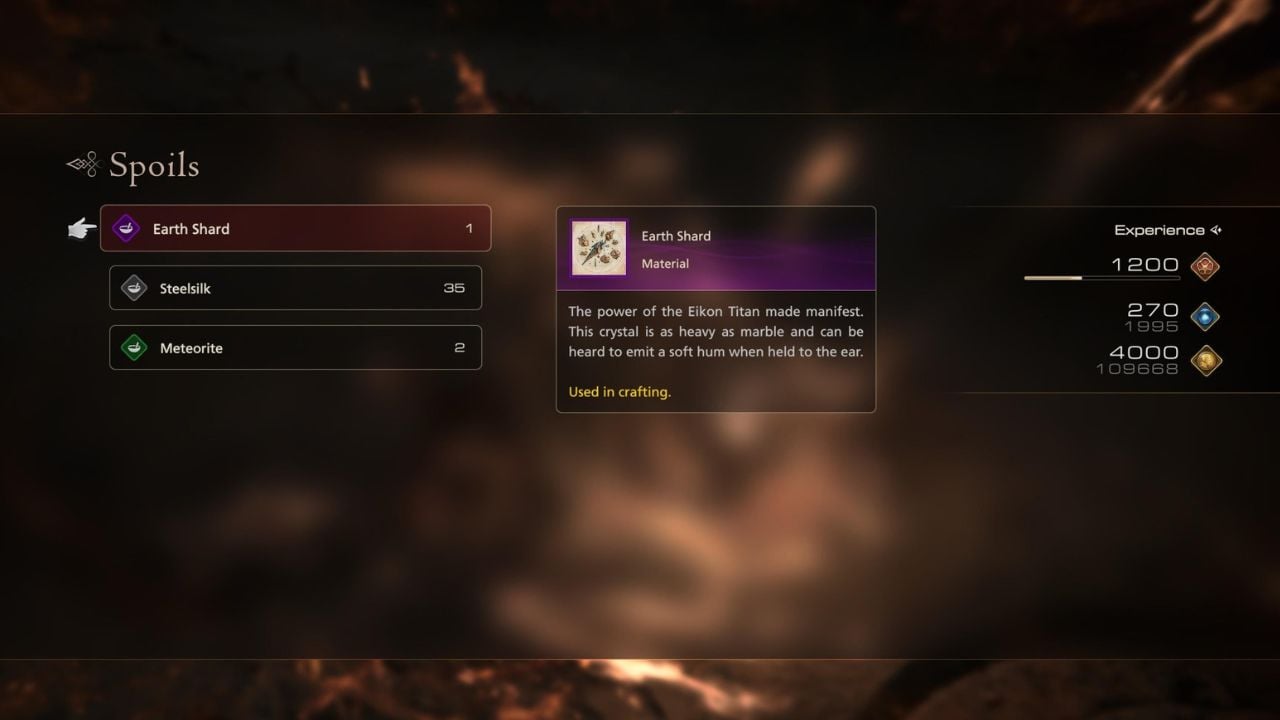
The Earth Shard is a one-time crafting material that drops upon defeating Hugo Kupka during the quest, Capital Punishment—where you’re tasked with saving the people of Rosalith.
The battle between Clive and Hugo at Rosalith will be their first, and it’s not easy.
How to defeat Hugo Kupka at Rosalith in Final Fantasy 16
Before entering the fight throne room, I highly recommend stocking up on all health potions and the Stoneskin Tonic, as it will increase your defenses for a short time. And Hugo’s attacks are painfully strong, so the extra defense you get from this tonic is worth the gil. Once you start, Hugo will enter a semi-primed state, so you don’t have to deal with Titan in this battle. But you do have to deal with Hugo in three phases, each with separate mechanics.
These are the mechanics you need to be careful of in the first phase:
- Arm-crossed Charge—As soon as Hugo crosses his giant arms in front of himself, he will charge you. To avoid this, you must dodge to the side rather than backward.
- Uppercut—Hugo will summon a giant arm and attempt to uppercut you. It’s best to dodge or shift out of his way to avoid this. There’s a window where you can attack him without any repercussions. Hit him with powerful attacks and move away.
- Punch-Kick Combo—This punch-and-kick attack can be tricky to see as he’s using his own arms rather than the giant glowing Titan ones, so you must be wary of this move. As he punches across his body, meaning he hits horizontally, the easiest way to avoid this attack is to dodge backward rather than to the side. You’ll want to dodge immediately to avoid his kick. So, dodge away twice.
- Elbow Charge—This attack is powerful, as Hugo will summon a Giant arm and charge at you with his elbow. It’s best to dodge either left or right to get out of his way.
After recovering and chuckling that he’s in his element surrounded by rock, you’ll enter the second phase of the fight with all new mechanics you need to be careful of. In this phase, they include the following:
- Geocrush—A circle will appear on the floor, signaling the start of this attack, where a fist will emerge at the very center. So, get out of the AoE zone. The main issue with this attack is there are two quake ripples, which hurt. I tried dodging them, but that’s not effective. The best way to avoid getting hit by these is to jump in the air.
- Double-Uppercut—Similar to phase one, Hugo will summon two giant arms and attempt to uppercut you, but there’s an additional forward punch you need to be mindful of. With two Precision Dodges or three not-so-clean but effective dodges, you can get out of his way and avoid his attacks.
- Multiple AoE circles—Several AoE circles will spawn on the ground. I found dodging the first AoE beneath my feet to get out of it and running between the rest the best way to avoid getting hit by a giant rock.
- Slamming Shockwave—Hugo will jump into the air and slam himself into the ground, sending a shockwave straight toward you. To avoid this, you should dodge to the side.
- Three Shockwave Ripples—Hugo will jump into the air and slam himself into the ground, except this time, three shockwaves will ripple across the room. You can dodge these, although I found this the most difficult because you do have to time it correctly, or you can jump over them.
- AoE Cone Strike—A circle will form on the ground, and in whatever direction Hugo is facing, there will be an AoE damage cone. The floor will have cracks and glow. You will take damage if you’re standing in this. So, dodge behind Hugo, where you’ll be safe, and you can attack him while he finishes his move.
- Leaping Punch—I would say this is the attack to be mindful of, as it can take a good portion of your health and has three separate attacks. Hugo will summon a giant arm and move it back as if readying a punch—and this is when you need to be ready to dodge. He will charge toward you and slam his arms down. He’ll rip up some stone and throw it, which you must also avoid. And then, he will start swinging, so be ready to dodge as soon as he does. He’ll also launch projectile arms at you, so avoid those, and he’ll jump into the air and slam his fist into the ground at your location.
- Super-Saiyan Charge—Similar to the Saiyans in Dragon Ball, Hugo will charge himself at the center of the room, growing larger and creating an AoE circle on the ground. Dodge out of this circle to avoid getting hit.
After the Saiyan-like attack, he’ll be staggered and return to normal size, so you can attack him with everything you have. And you’ll enter phase three of the fight. For the most part, his mechanics are the same as phase two, but there are two new mechanics you’ll need to be mindful of:
- AoE Crystal Quakes—An AoE cone will form on the ground before Hugo. There will be a small ripple that causes crystals to spawn, and then another quake will occur, which you should jump to avoid.
- Giant Arm Clap—Hugo will spawn two giant arms beside himself and clap them together. As soon as you see the arms generate, start dodging away.
Once you know his mechanics, you can strike for a limited time after the attacks because he has a brief cooldown window. To defeat him, keep avoiding his mechanics and attacking when possible, and eventually, you’ll take him down in the most gruesome yet satisfying way, at least for now.
Upon defeating him, you’ll receive the Earth Shard, which you can use to craft a deadly weapon—the Grindstone.
Final Fantasy 16: How to craft Grindstone using Earth Shard
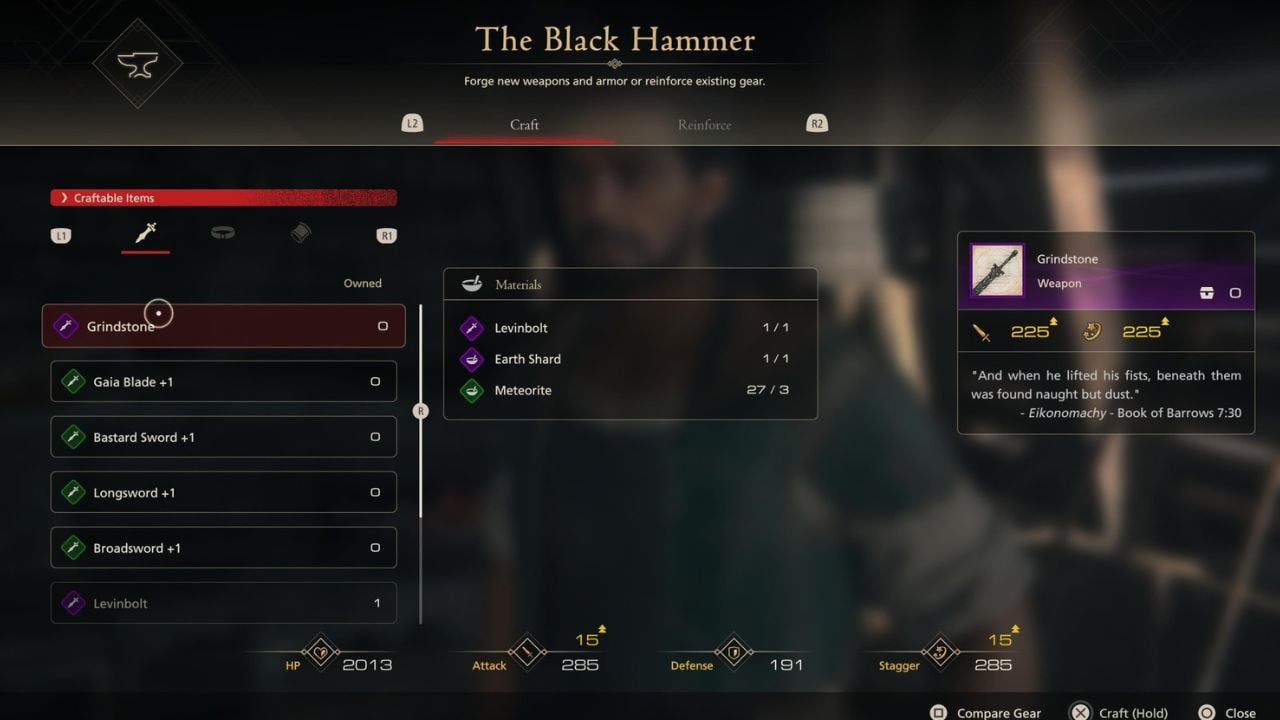
To craft the weapon, Grindstone, you must have completed the quest, Capital Punishment, to get the Earth Shard, and have crafted Levinbolt, a sword you may have crafted using the Lightning Shard. And Levinbolt is a sword crafted from the weapon, Stormcry, and the Fire Shard.
Once you’re ready to start crafting, go to the Blacksmith in The Hideaway and start crafting. We’ve included everything you need to know about Grindstone’s recipe and stats in the table below.
| Item Name | Quest Requirements | Recipe | Grindstone’s Stats |
|---|---|---|---|
| Grindstone | Capital Punishment, main campaign quest | One Levinbolt One Earth Shard Three Meteorites | 225 Attack Damage and 225 Stagger Damage. |
Although defeating Hugo requires a lot of dodging and attack-planning, getting the Earth Shard is worth it so you can craft Grindstone in Final Fantasy 16.


Published: Jun 25, 2023 08:06 pm