
Berengaria is a beast of a unit in Unicorn Overlord, especially with the right loadout. Combining a Greatshield with an Axe makes her a star on any squad. But she needs to be on the right squads, with the best gear, to get the most out of her.
Best units to squad with Berengaria
Berengaria is a tank in Unicorn Overlord, dealing with blows readily and dealing significant damage on the crack-back. However, as a single-hit Axe user, she can suffer a bit against high evasion units like Thieves and Swordfighters, and she doesn’t protect her fellows as well as dedicated tanks can. The following unit types serve Berengaria well on a growing army.
It goes without saying Berengaria does her best work in the front slots, typically in the center. You want her to get hit fairly often to trigger her counter passives. We recommend putting Berengaria on a Flying Unit Leader Team. Berengaria is slow as an Infantry, without a fantastic Leader Skill. She’s much better off getting more mobility so she can bring the axe down on her foes where you need her. You can put her on Cavalry, too, but we found she serves many of the same roles as a Cavalry unit without much issue.
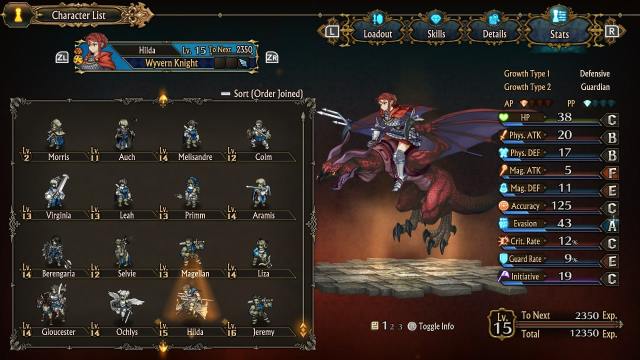
- Flyers: A unit like Hilda works great for maneuvering Berengaria across the battlefield if you make them the leader. Hilda is an especially great partner for Berengaria thanks to her high natural defenses, so she can frontline well. Having anti-cavalry is icing on the cake.
- Hunters, Snipers, Swordfighters, Swordmasters: Berengaria’s terrible time against Scout-type units can be quickly addressed by auto-hit classes. We recommend pairing her with units like Melisandre or Rolf to pick away at these dodgy fellas.
- Clerics, Bishops, Priestesses, High Priestesses: While Berengaria can heal herself, her allies aren’t so lucky. Bring a Healer, like Scarlett, who can deal with the lowered damage your allies take during fights with Berengaria up front.
- Anti-Armor:While Berengaria can deal great damage to rows, she can suffer a bit against Hoplites or good blockers without specific anti-armor weaponry. Warriors and Magic Users can compensate for this just fine.
- Shaman, Druid: One of Berengaria’s strongest options is her level 30 Vicious Torment, a 75 Potency finishing move which deals double damage against those under status effects. A Shaman like Sylvie is a great choice to land this move more often.
- Hoplite, Vanguard: While the last thing Berengaria needs is more defense, the backline of her squad can be susceptible to Fliers and Hunters. A Hoplite can jump in and protect those most vulnerable to attacks when required. This unit shouldn’t stay on the squad full-time and instead be swapped out based on what mission you bring Berengaria to.
Best equipment for Berengaria

Berengaria is a unit with an Axe slot, Greatshield slot, and two Accessory slots. This gives her a lot of opportunities to be aggressive, which we highly recommend. Berengaria’s skills are more than enough to keep her in-the-game until the fight is over, so going full damage will let her tank in the best way possible—Murder.
- Weapon—Aggressive Option: Durability axes aren’t bad, but focus on Crit Rate and raw damage. The Dragonbone Axe, for example, can let enemies attack Berengaria first, potentially giving you more chances to counterattack for massive damage.
- Greatshield—Durability: The Greatshields of Unicorn Overlord focus largely on durability rather than damage. We like the Gran Baris to keep debuffs off of Berengaria, but options like the Templar’s Greatshield can work for recovering life after damage taken or the Champion’s Greatshield to focus damage on Berengaria instead of her allies.
- Accessory One—Damage or PP restoration: A pure damage accessory is great for Berengaria, as she usually wants just a touch of damage to clear a row or execute someone with Vicious Torment. The Warrior’s Medallion works early. However, as you approach the late-game, you will want more procs of Pain Bringer. We recommend the Dream Crown so she can get more damage out of her early actions, though the Sapphire Pendant can work well.
- Accessory Two—Ruby Pendant: We like the Ruby Pendant too much on Berengaria. Two more AP means she’ll almost certainly clear a row with two spins or land a great execute with Vicious Torment. Her passives are fine, but usually only need to be used the once.
You can make a tank Berengaria work just as well without many adjustments. We’d recommend using a Sapphire Pendant instead of a Ruby one and a Champion’s Greatshield to ensure she can get hit and trigger Painbringer often enough. We’d also recommend using a status weapon, like the Crushing Axe or Venom Axe.
Best conditions for Berengaria

Berengaria’s axe can be unwieldy in the wrong circumstances, thanks to her expensive attacks. Let’s set up some conditions for her so she casts the right thing at the right time.
- Vicious Torment—Enemy is afflicted, Enemy HP < 50 percent: We want her be executing foes, but only when she has a good target. It costs her two AP to hit a single guy for this attack, so she should be spinning whenever this isn’t dealing 150 base Physickal Potency and killing the target.
- The primary slot can be replaced with attacks that cause status effects, should you get the right Axe for it. This is especially useful for a Tank variant of Berengaria or one that wants to cause more afflictions to her foes.
- Death Spin—Row with two plus combatants: This should be Berengaria’s basic attack. Most rows have at least two foes, so this condition will trigger most of the time. You can move this attack’s priority up or down, depending on enemy units—we like to keep it at two unless we’re fighting many Hoplites or other units with Guard.
- Carnage—Enemy AP at Two or Less: We like this one to be dynamic, since enemy AP can either be minimally impactful or incredibly dangerous. However, in general, locking an enemy out of their last few AP can be great for keeping them from healing or performing annoying attacks.
- Eye of the Warrior Princess—No condition: This activates at the start of the fight and should be her highest priority.
- Painbringer—Own AP is three or less: If you don’t have the Ruby Pendant, put this at one less than her maximum AP. Painbringer is an excellent passive, but we only want it to trigger if it gives us AP back. Otherwise, we’d prefer her cast Sanguine Pursuit.
- Sanguine Pursuit—No condition: Sanguine Pursuit is a great ability, letting Berengaria automatically swing on people who hurt her. So, we’re completely okay with her using most of her PP on this.


Published: Mar 14, 2024 07:18 am