The default region in Deadlock may not necessarily suit you, and if you require a quickfire change to improve your experience, you can change your region.
It’s easy to overlook a title’s most basic settings in favor of its deeper gameplay elements. For instance, knowing Deadlock’s confirmed and leaked characters and our tier list to see who’s best could be more important to you than the best graphical or controller settings.
Deadlock‘s region allocating is another “basic” feature, but it can have a bigger bearing on your gameplay than you might think.
Changing server regions in Deadlock, explained
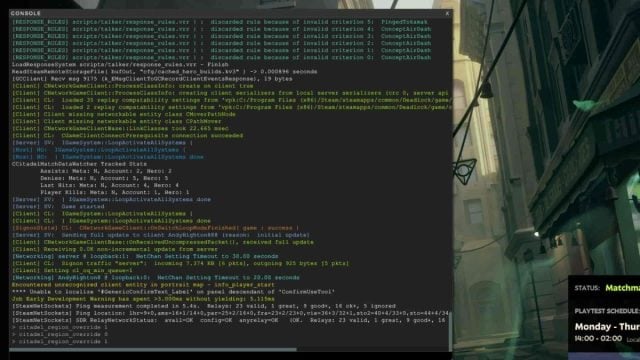
To change your region in Deadlock, go to the main menu, press F7, type in the region command for the region you’re after, and hit enter.
It’s a really simple process to execute (thanks to the ease of Console Commands) and one you can learn more about with our step-by-step process:
- Open up Steam and start up Deadlock.
- On the main menu, press F7 on your keyboard.
- This brings up the console command box in the top-left portion of your screen.
- In the input box toward the bottom of the command box, type in one of the following commands for the region you desire:
- Automatic: citadel_region_override -1
- North America: citadel_region_override 0
- Europe: citadel_region_override 1
- Asia: citadel_region_override 2
- South America: citadel_region_override 3
- Oceania: citadel_region_override 5
- Do this and press the Enter key.
- You can check the in-game timers on the menu screen to see if this has worked. The times should change to reflect the region switch.
Switching Deadlock’s region to a more applicable one allows you to matchmake lobbies suited to your internet connection and localization. If you’re struggling to access servers due to overloaded capacity, trying another region might also get you in—at the expense of a stable connection.
Learn more about Deadlock, including the best Infernus, Shiv, and Warden builds.








Published: Aug 27, 2024 09:04 am