To consistently perform in VALORANT, you need the best VALORANT settings. Typically, it’s not a one-size-fits-all configuration, but these guidelines will push you in the right direction. We’ve found the settings that will cover most types of players.
So, if you want to use the best VALORANT settings but are unsure where to start, here’s everything you need to know.
Table of contents
Best General settings for VALORANT
Accessibility
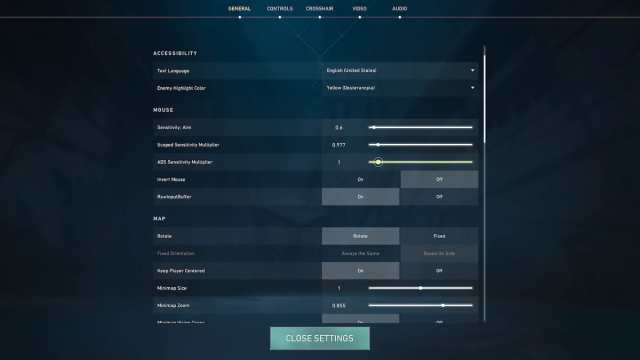
The General settings in VALORANT cover a fairly wide range of options, many of which come down to personal preference. But if you’re looking to optimize your game, there are some settings to note.
- Enemy Highlight Color: This setting is mostly up to preference, however, many players choose yellow as it seems to cause enemies to stick out slightly more than other colors.
Minimap
Your minimap is integral in knowing your position relative to everyone around the map. You’ll be able to spot things like opponents shooting or even when your teammates are rushing onto the A-site without you. I typically keep the zoom low enough so I can see the entire map at all times. This is due to the sheer amount of abilities in VALORANT that show up on the minimap.
It’s extremely useful to be able to see the vital information. I also make sure that “Keep Player Centered” is set to off. Make your minimap rotate so you can easily identify locations at a glance.
Other
Moving on to the Other section, some have minimal impact on your game and are completely up to you. Yet, there are also quite a few important tweaks when considering the most optimal settings in VALORANT.
- Always Show Inventory: Off
- Player Loadouts Always Visible: Off
- Cycle to Next/Prev Weapon Wraps Inventory: Off
- Cycle to Next/Prev Weapon Includes Spike: Off
- Show Blood: On
- Instability Indicators: On
- Show Corpses: Off
- Show Bullet Tracers: On
- Network Buffering: Minimum
- Use Team Color for Crosshair: Off
- Hide User Interface in Game: Off
Best Video settings for VALORANT
General

Having the correct Video settings applied is one of the most important aspects when it comes to optimizing VALORANT.
- Display Mode: Fullscreen
- Resolution: Set to your monitor’s native resolution with the highest possible refresh rate
- Aspect Ratio Method: Letterbox
- Limit FPS: Off, although it can be set to On in Menus and Background if preferred.
- NVIDIA Reflex Low Latency: On + Boost (Note: this setting is only available for those with an NVIDIA graphics card)
Graphics Quality
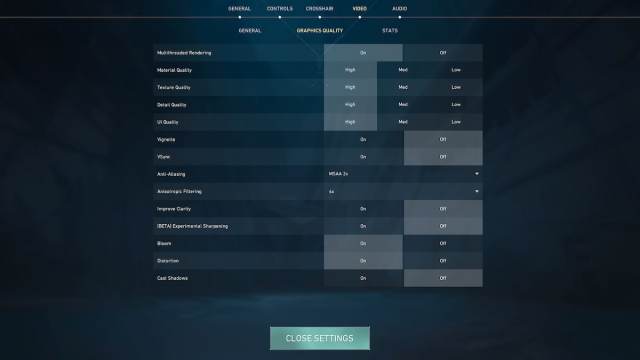
Optimized graphics quality can provide the highest possible frame rate while attempting to salvage as much video quality as possible. It should be noted that with a higher-end PC, you can bump these up to your liking. I personally start at the top and work my way down from the top settings until I have a stable frame rate.
- Multithreaded Rendering: On
- Material Quality: Medium
- Texture Quality: Medium
- Detail Quality: Low
- UI Quality: Low
- Vignette: Off
- VSync: Off
- Anti–Aliasing: Either None or MSAA 2x, depending on your preference
- Anisotropic Filtering: 2x or 4x, depending on your preference
- Improve Clarity: Off
- [BETA] Experimental Sharpening: Off
- Bloom: Off
- Distortion: Off
- Cast Shadows: Off
Setting the Material and Texture Qualities to “Medium” only minimally affects performance, while putting it to “Low” impacts visuals too much.
Stats
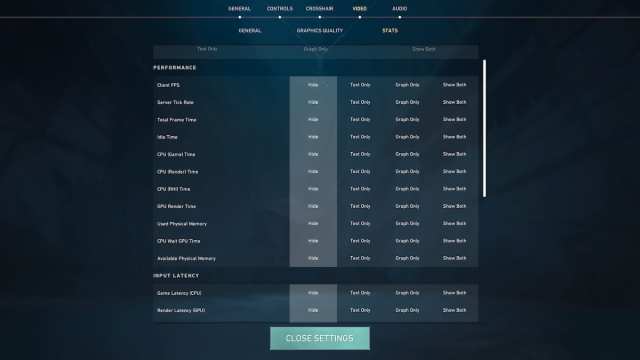
Lastly, the Stats section has no real impact on performance in VALORANT and is mostly up to personal preference, but some information these settings provide can be helpful.
Here are our recommendations:
- Client FPS: Text Only
- Server Tick Rate: Text Only
- Total Frame Time: Hide
- Idle time: Hide
- CPU Game Time: Hide
- CPU Render Time: Hide
- Network Round trip Time: Text Only
- Packet Loss: Text Only
- Game to Render Latency: Hide
- Game Latency: Hide
- Render Latency: Hide
Best Audio settings for VALORANT
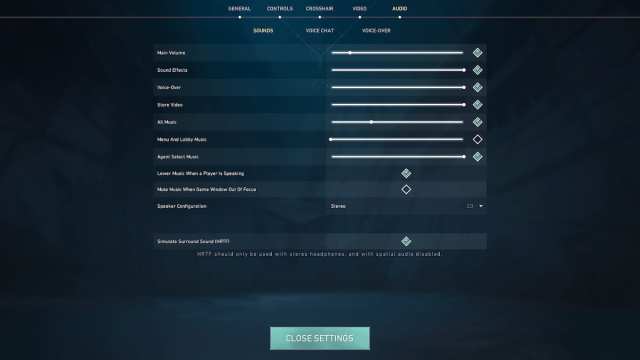
The best Audio settings are almost entirely up to your own personal preference and depend on your PC’s sound settings, among other factors, but there are a few settings worth noting.
- All Music Overall Volume: Unchecked if you desire fewer distractions from gameplay
- Lower Music When a Player Is Speaking: Checked if you have in-game music turned on (This setting mutes all music when a teammate is speaking through VALORANT‘s in-game voice chat)
- Simulate Surround Sound (HRTF): On
Best Crosshair settings for VALORANT
Crosshair settings in VALORANT are mostly up to personal preference and even pro players’ choices vary in that regard. Generally, it’s recommended to create a crosshair that isn’t too thick or wide so you can still see your opponents behind it.
A very common crosshair uses the following settings:
- Crosshair Color: Preference
- Outlines: On
- Outline Opacity: 1
- Outline Thickness: 1
- Center Dot: Off
- Override Firing Error Offset with Crosshair Offset: Off
- Override All Primary Crosshairs With My Primary Crosshair: Off
- Show Inner Lines: On
- Inner Line Opacity: 1
- Inner Line Length: 3
- Inner Line Thickness: 1
- Inner Line Offset: 3
- Movement Error: Off
- Firing Error: Off
- Show Outer Lines: Off
Both Movement Error and Firing Error can be helpful for newer players to get a grasp on the combat system in VALORANT and can be set to “On” for those who struggle or primarily play other genres.
Best Mouse settings in VALORANT

Before figuring out your sensitivity, you may want to enable RawInputBuffer if you can run VALORANT at over 60 FPS. For more info on this setting, you can check out our detailed analysis. The rest of the settings come down to personal preference.
You’ll want to take your time and head into a Deathmatch server and adjust accordingly. There are multiple different tactics for finding your best sensitivity. It could be helpful to note that the average eDPI of professional VALORANT players is 280, and 81 percent use a 1.0 scoped sensitivity multiplier, according to Pro Settings. To calculate your own eDPI, multiply your in-game sensitivity and your mouse’s DPI. This can be checked through most mouse software and usually sits at 400, 800, or 1600.
The settings will depend on a variety of different factors. Things like your sensitivity will change depending on the size of your desk, mousepad, and mouse. These recommendations should be seen as a guide and not the ultimate end-goal mouse settings.
An excellent way to test your sensitivity is by simply placing your mouse on the left-hand side of the mousepad and then scanning across to the other side until you do a 180. If you can complete a perfect 180-degree turn as you reach the right side of the mousepad, there’s your sensitivity. You can then change it up and down depending on whether the game requires faster movement.
Beginner
- DPI: 1000
- eDPI: 300
- Polling Rate: 500
- In–game Sensitivity: 1.4
- Scoped Sensitivity: 1.2
- Windows Sensitivity: 6
Advanced
- DPI: 800
- eDPI: 320
- Polling Rate: 1000
- In–game Sensitivity: 0.4
- Scoped Sensitivity: 1.2
- Windows Sensitivity: 6
Minimum and Recommended PC specs for VALORANT
Riot Games provides both the minimum and recommended specs for VALORANT in the Help and Support section on their website. Here are those specs.
| Minimum Requirements (30 FPS) | Maximum Requirements (60 FPS) | |
| CPU | Intel Core 2 Duo E8400 AMD Athlon 200GE | Intel i3-4150 AMD Ryzen 3 1200 |
| GPU | Intel HD 4000 AMD Radeon R5 200 | GeForce GT 730 AMD Radeon R7 240 |
| RAM | 4 GB | 4 GB |
| OS | Windows 10 (Build 17134+) 64-bit Windows 11 64-bit | Windows 10 (Build 17134+) 64-bit Windows 11 64-bit |





Published: Feb 28, 2025 06:48 am